
Google Maps Platform API keys for WordPress Sites
It’s no secret that Google is one of the most frequently used search engines worldwide. Millions of consumers use Google to search for information and business locations daily. If you own a brick-and-mortar company, adding Google Maps to your website is a great way to increase user-friendliness and let visitors know how close they are to your location or service areas.
The first step to adding a Google Maps location to your website is generating a Google Maps API key. While it may seem like an intimidating process, creating an API Key isn’t as complicated as it can seem. It takes just a few steps to make a big impact on your user experience.
In this blog, we will cover how to:
If you are a new Google Cloud user who DOES NOT have billing set up, an API Key will be automatically generated for you upon signing up.
If you are a returning Google Cloud user with billing set up, you will be taken to the ‘Credentials’ page, where you can create an API Key.
How to Automatically Generate Google Maps Platform API Keys for WordPress Sites as a New User
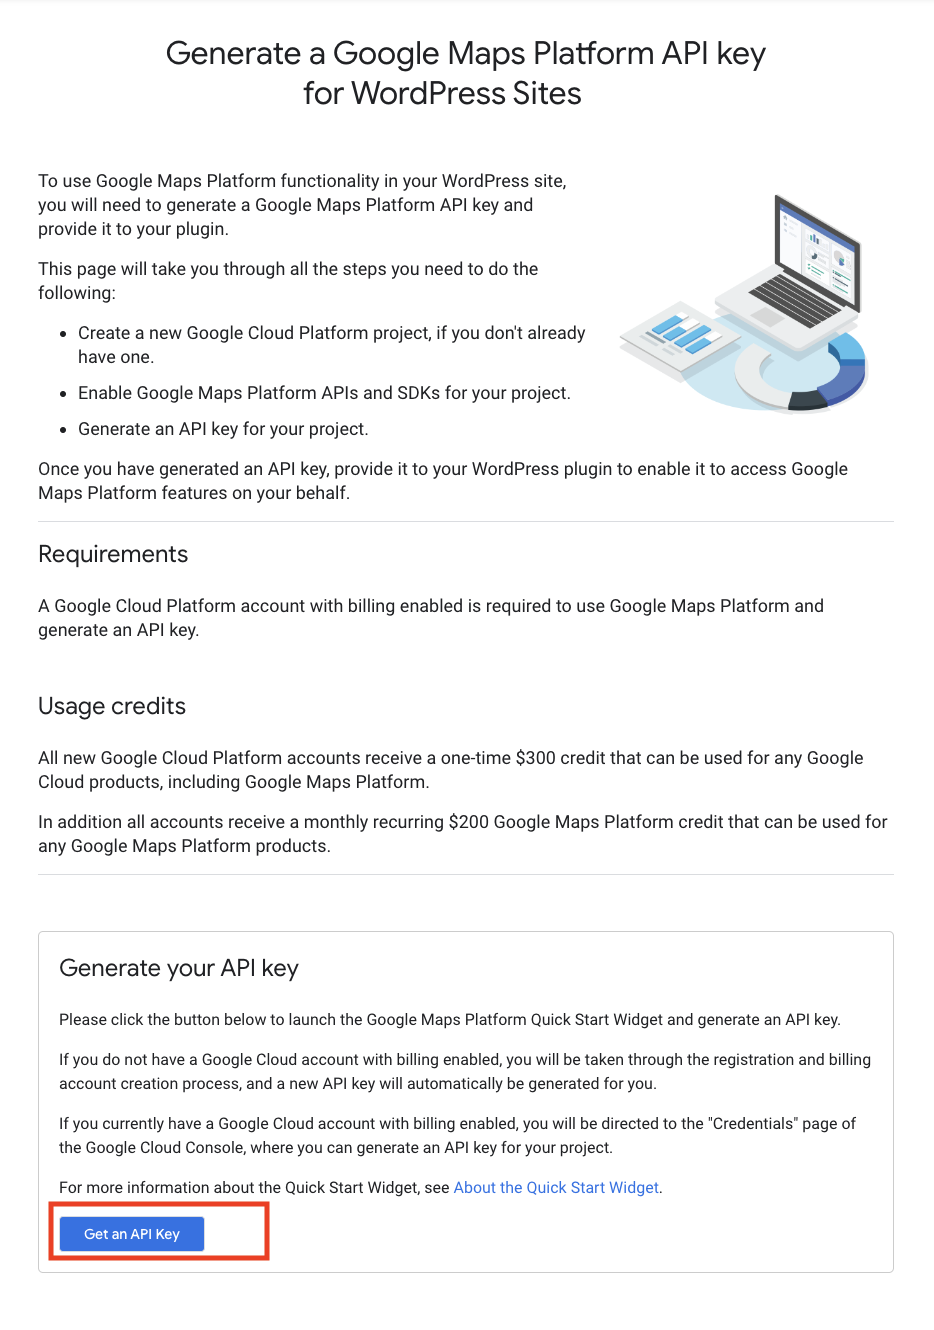
The simplest way to get your API Keys without using a plugin is through the Google Maps Platform. As a standard Google Cloud user, you can visit the Google Maps Platform and have your key automatically set up by following the prompts.
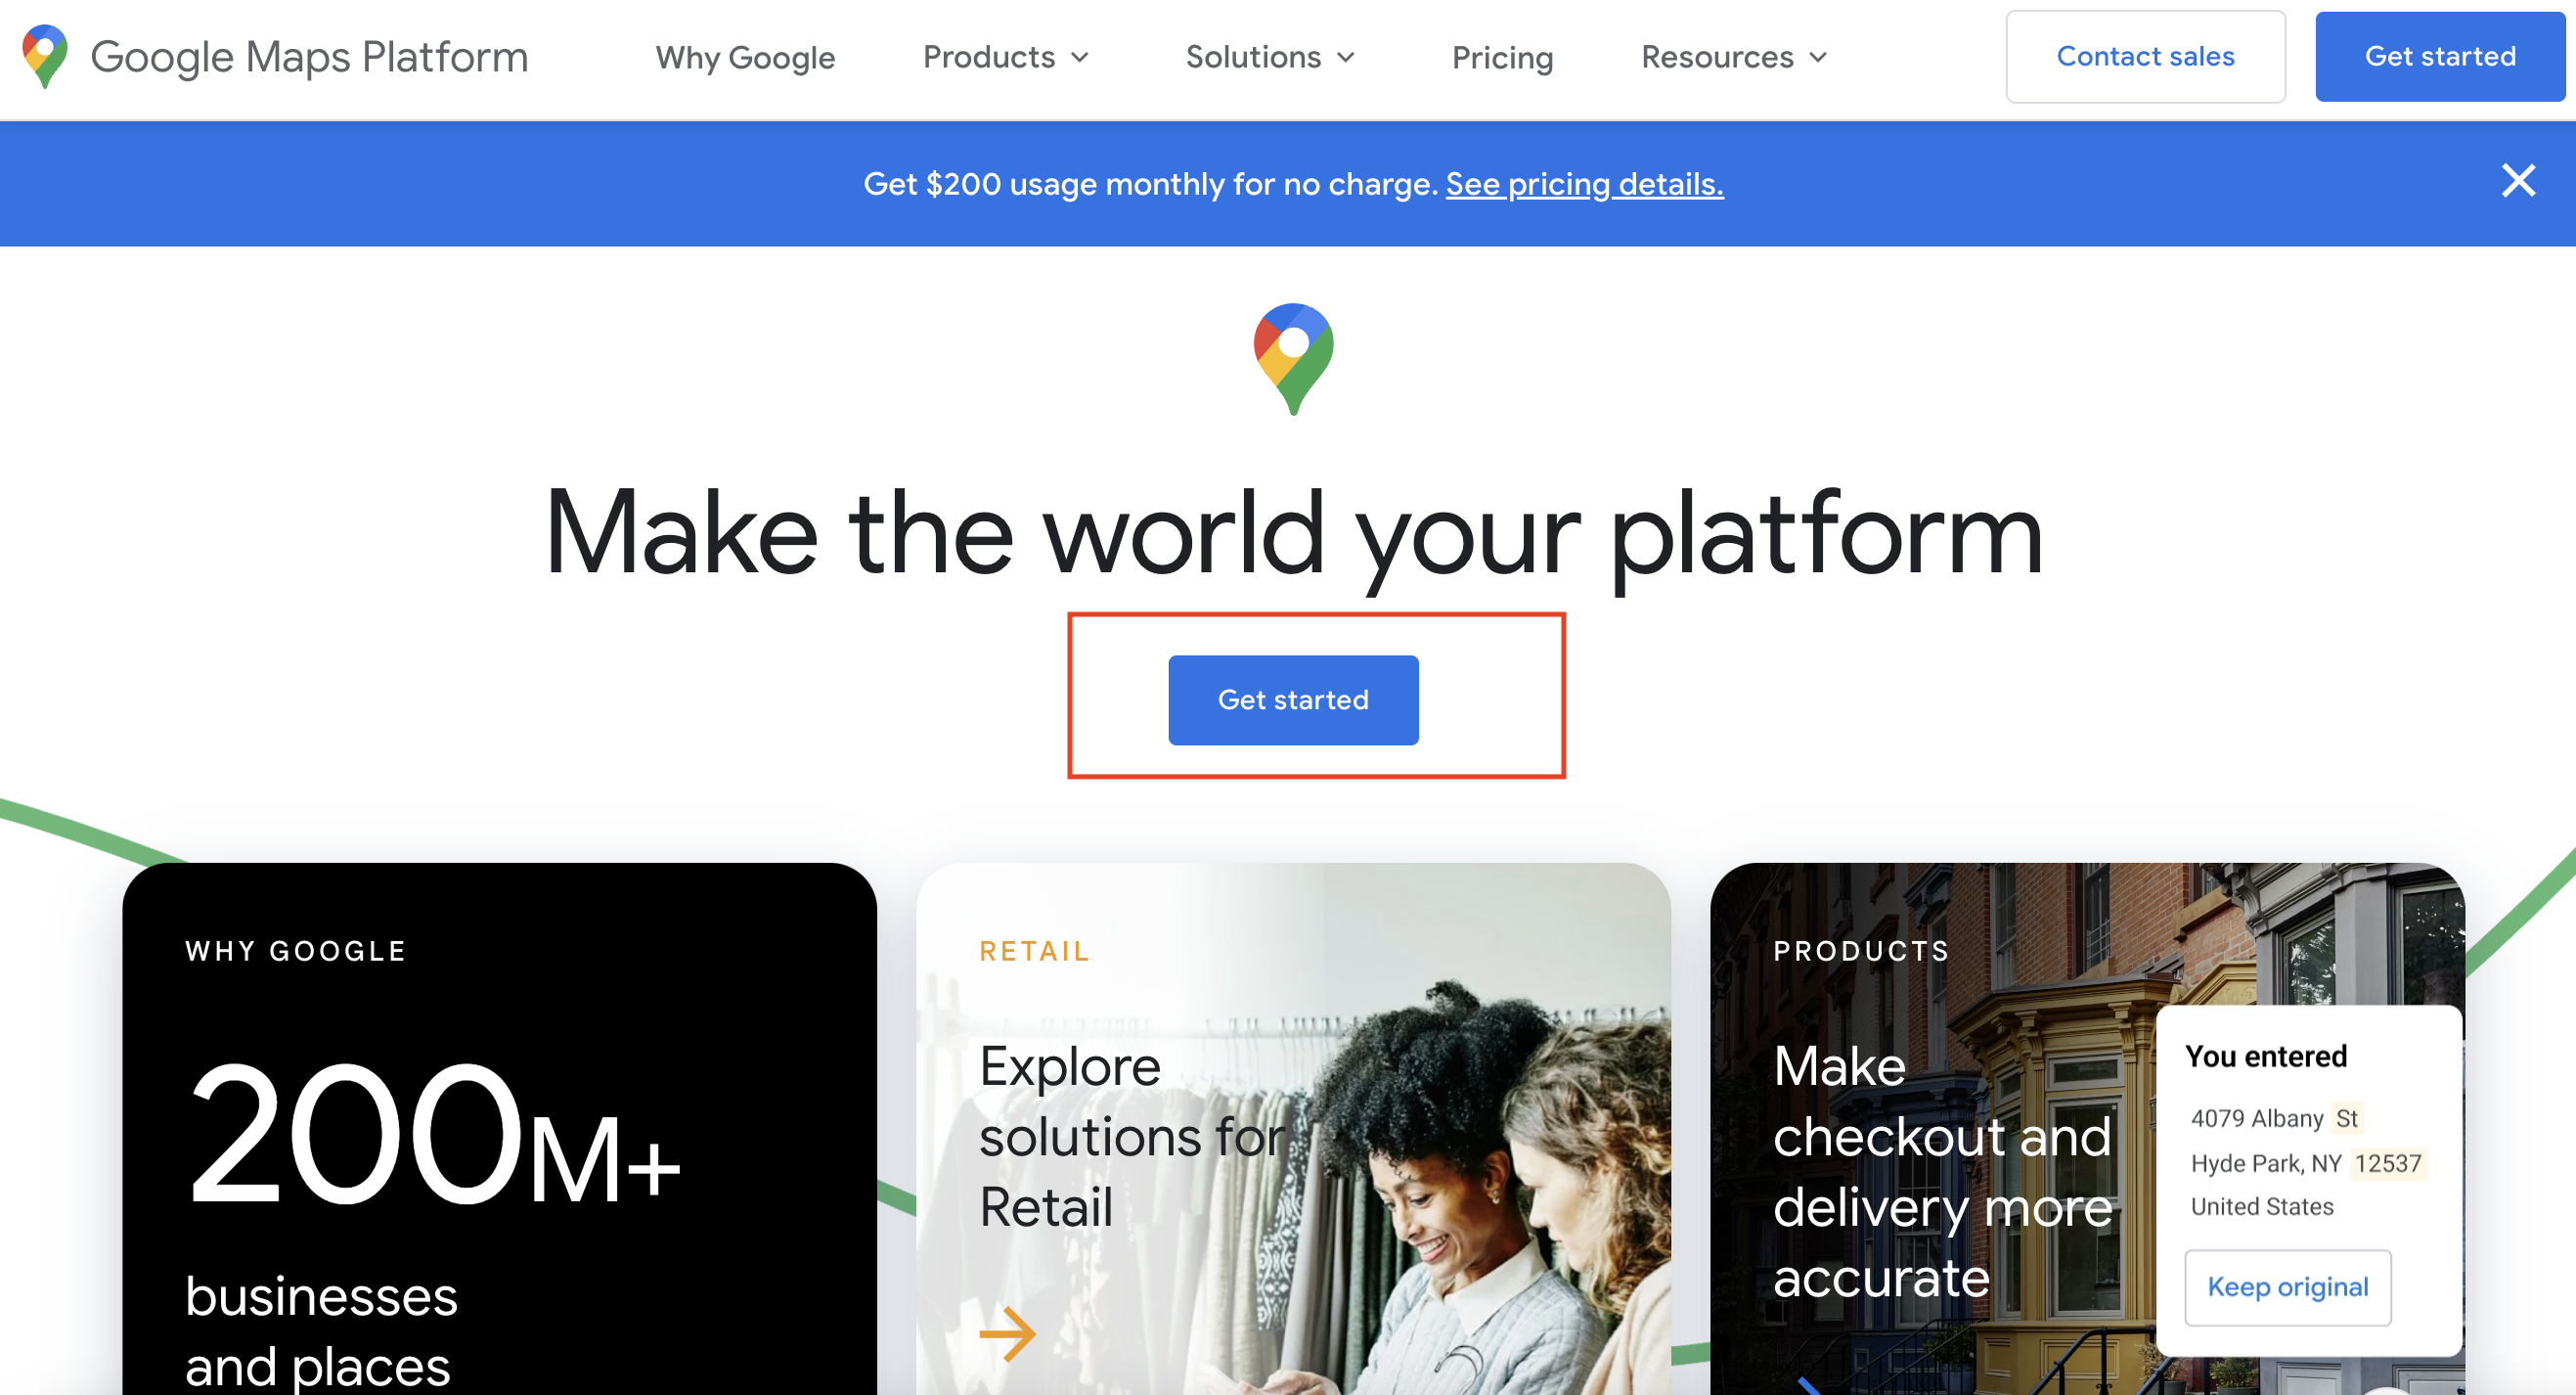
Step 1: Select ‘Get an API Key’
If you already have Google Cloud billing enabled, you will be redirected to the ‘Credentials’ section of the Google Cloud Console. Please skip to the manual setup section below and follow the manual setup steps.
If you do NOT have Google Cloud billing enabled, you must create an account, and an API key will be generated for you automatically.
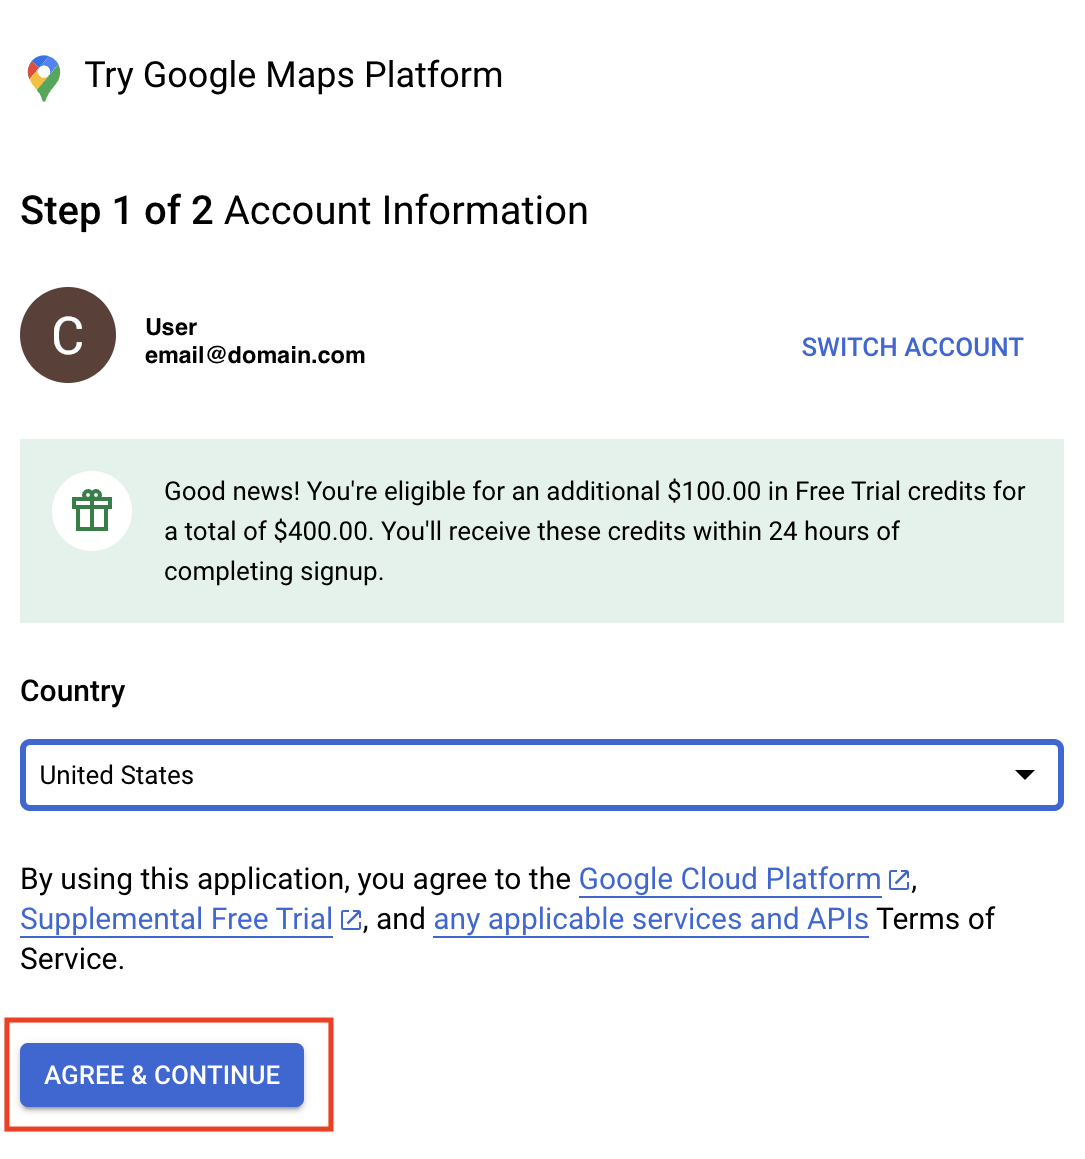
Step 2: Create an Account
You must create a new Google Cloud account and add your payment information to get started. Keep in mind that Google gives you a $300 credit-free trial. After the trial, you will get 28,000 requests per month, and 40,000 direction calls each month before being billed. These are high quotas to meet and atypical for a small business/startup, and Google only bills you once you exceed the $200 per month credit limit.
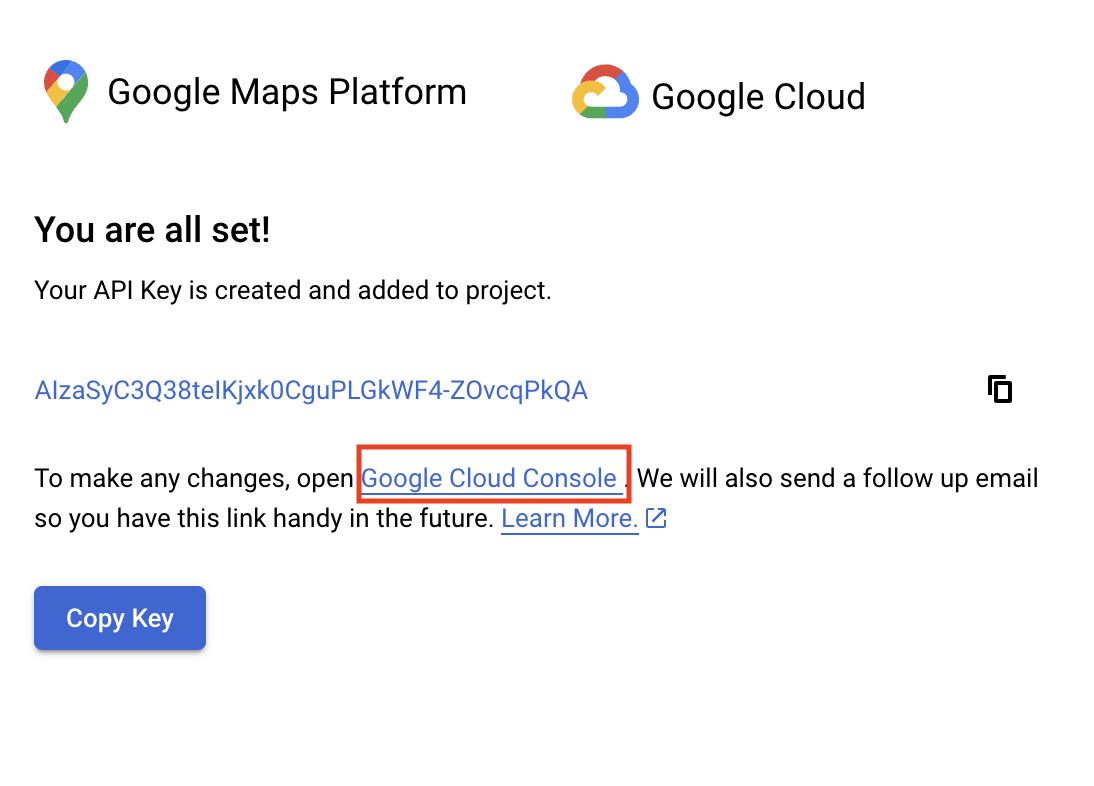
Step 3: Copy API Key & Set Up Restrictions
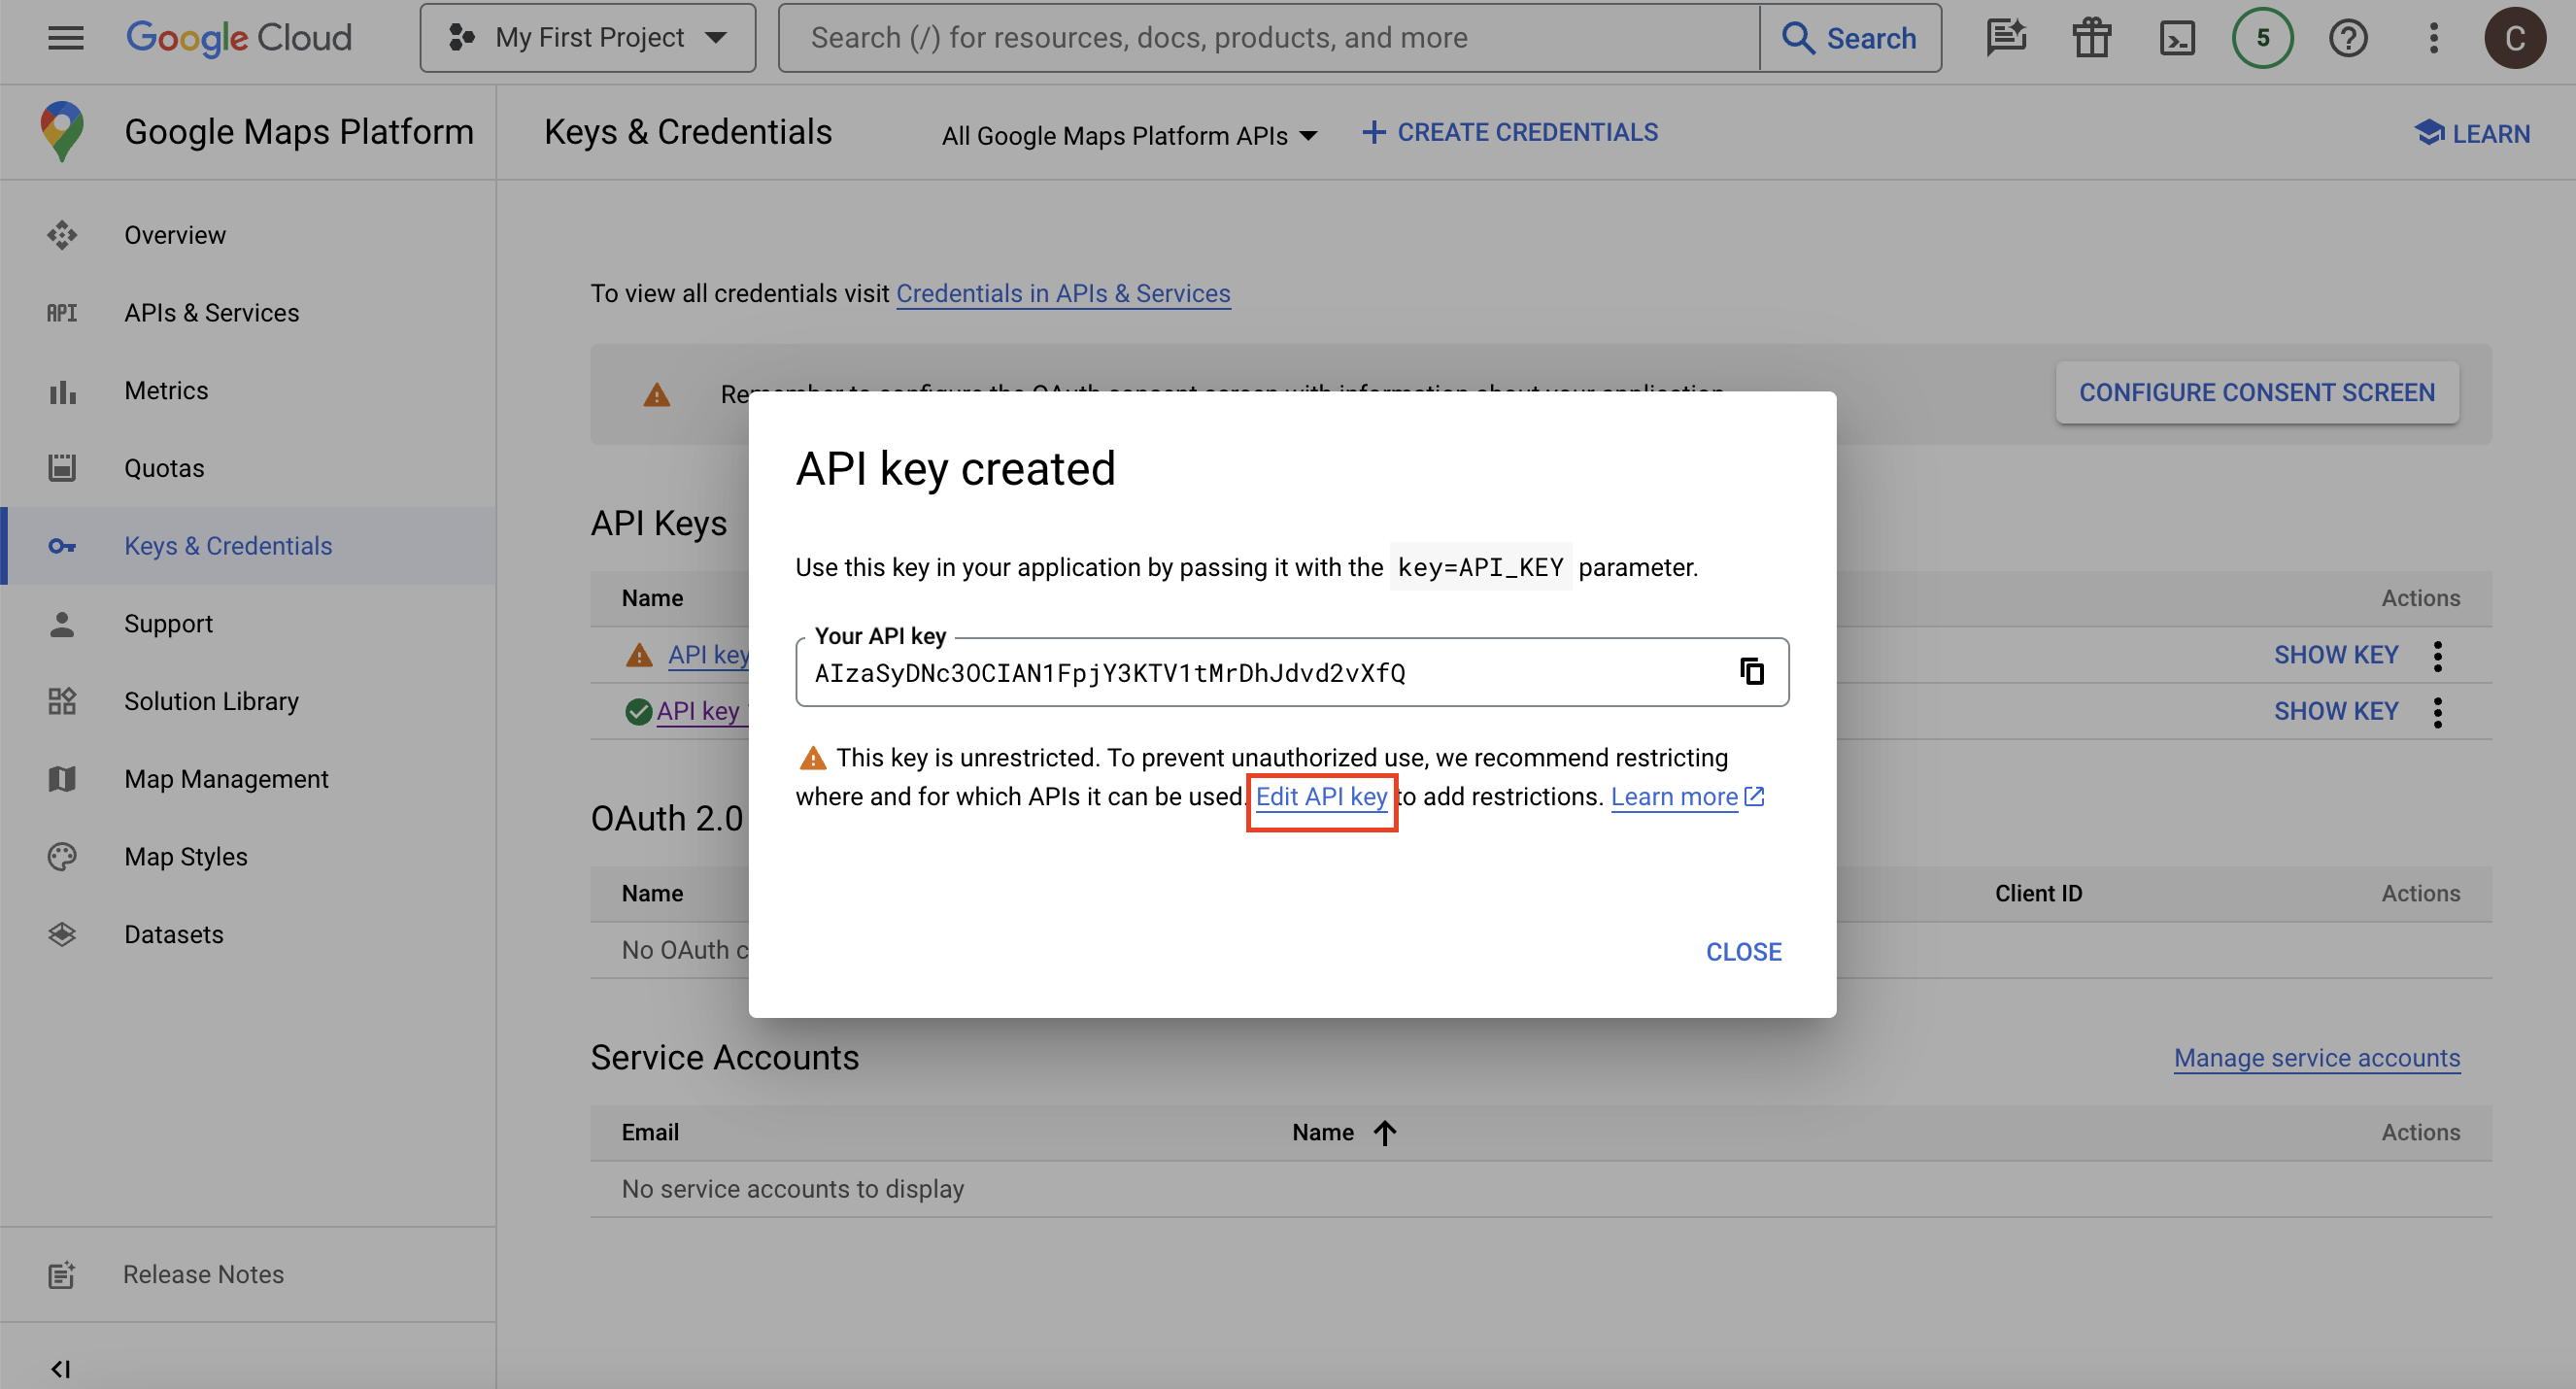
Once you’ve set up your account and billing information, you will be given an automatically generated API Key.
Next, select Google Cloud Console to be re-directed to the Google Cloud page, where you will set up the second API Key and proper restrictions to ensure security.
Step 4: Ensure Proper APIs are Enabled
Before setting up restrictions on your API Key, you must check your APIs and Services to ensure you have the correct map products enabled. These are generally enabled by default when your API Key is auto-generated. However, there are times when this must be done manually.
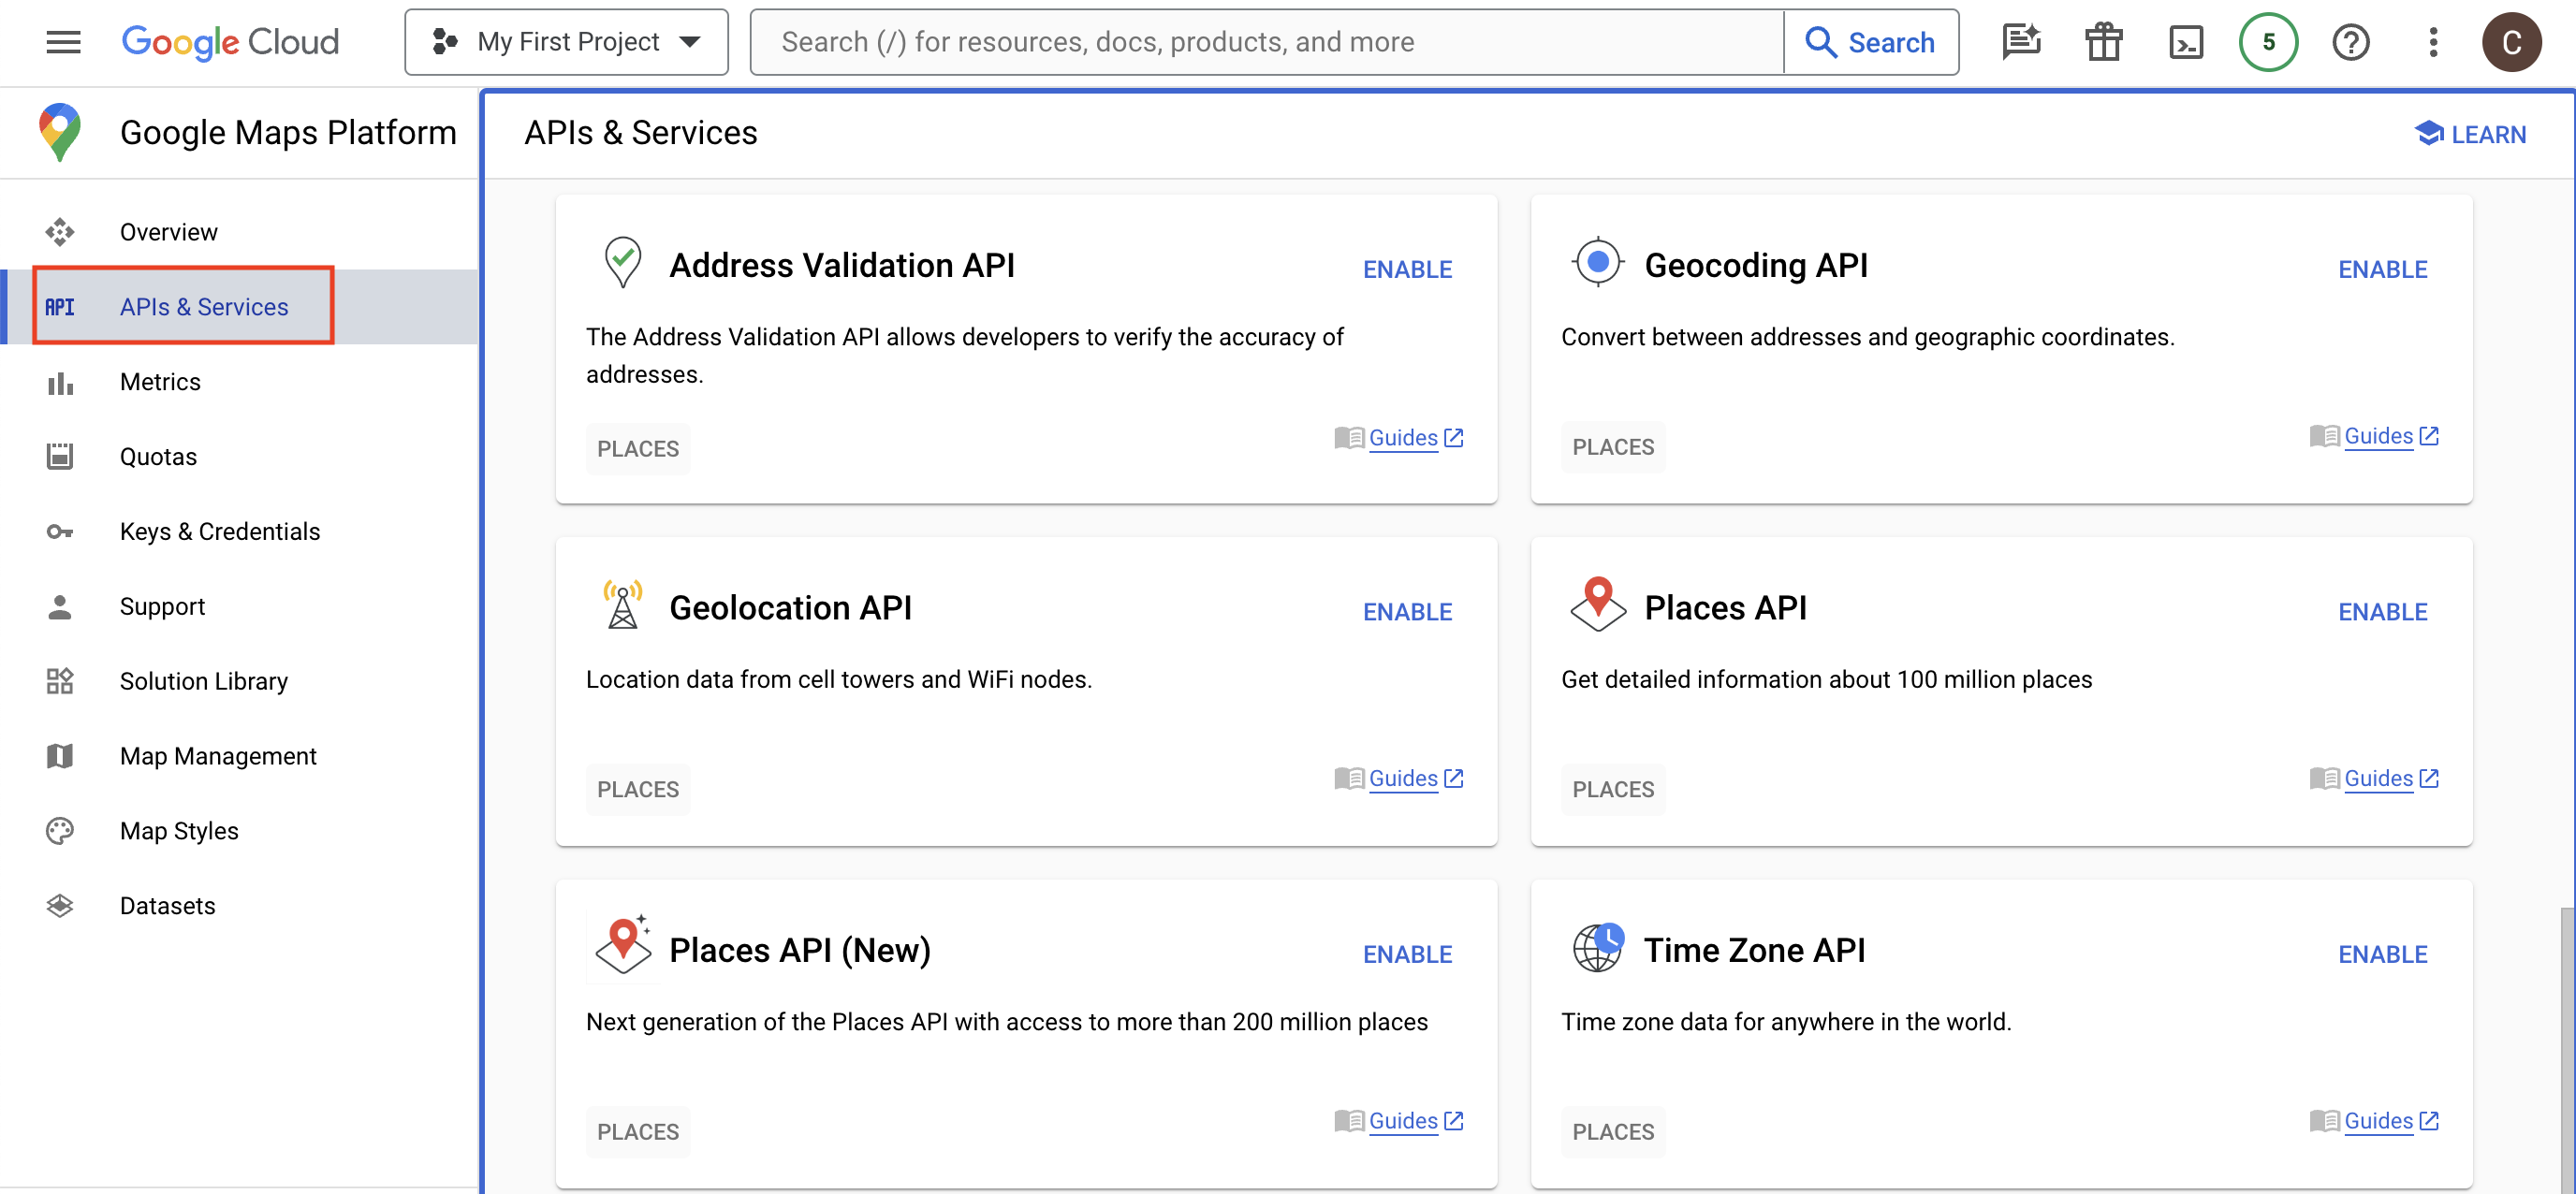
Next, enable the following products:
- Javascript API
- Geocoding API
- Directions API
- Distance Matrix API
- Elevation API
- Places API & Places API New
- Static Maps API
Step 4: Setting Up HTTPS (Website) Restrictions
Now that you have enabled the correct API products head back to the API Keys by selecting Keys & Credentials on the left side, clicking the three dots, and ‘Edit API Key.’ From here, you must set up restrictions for your API Key.

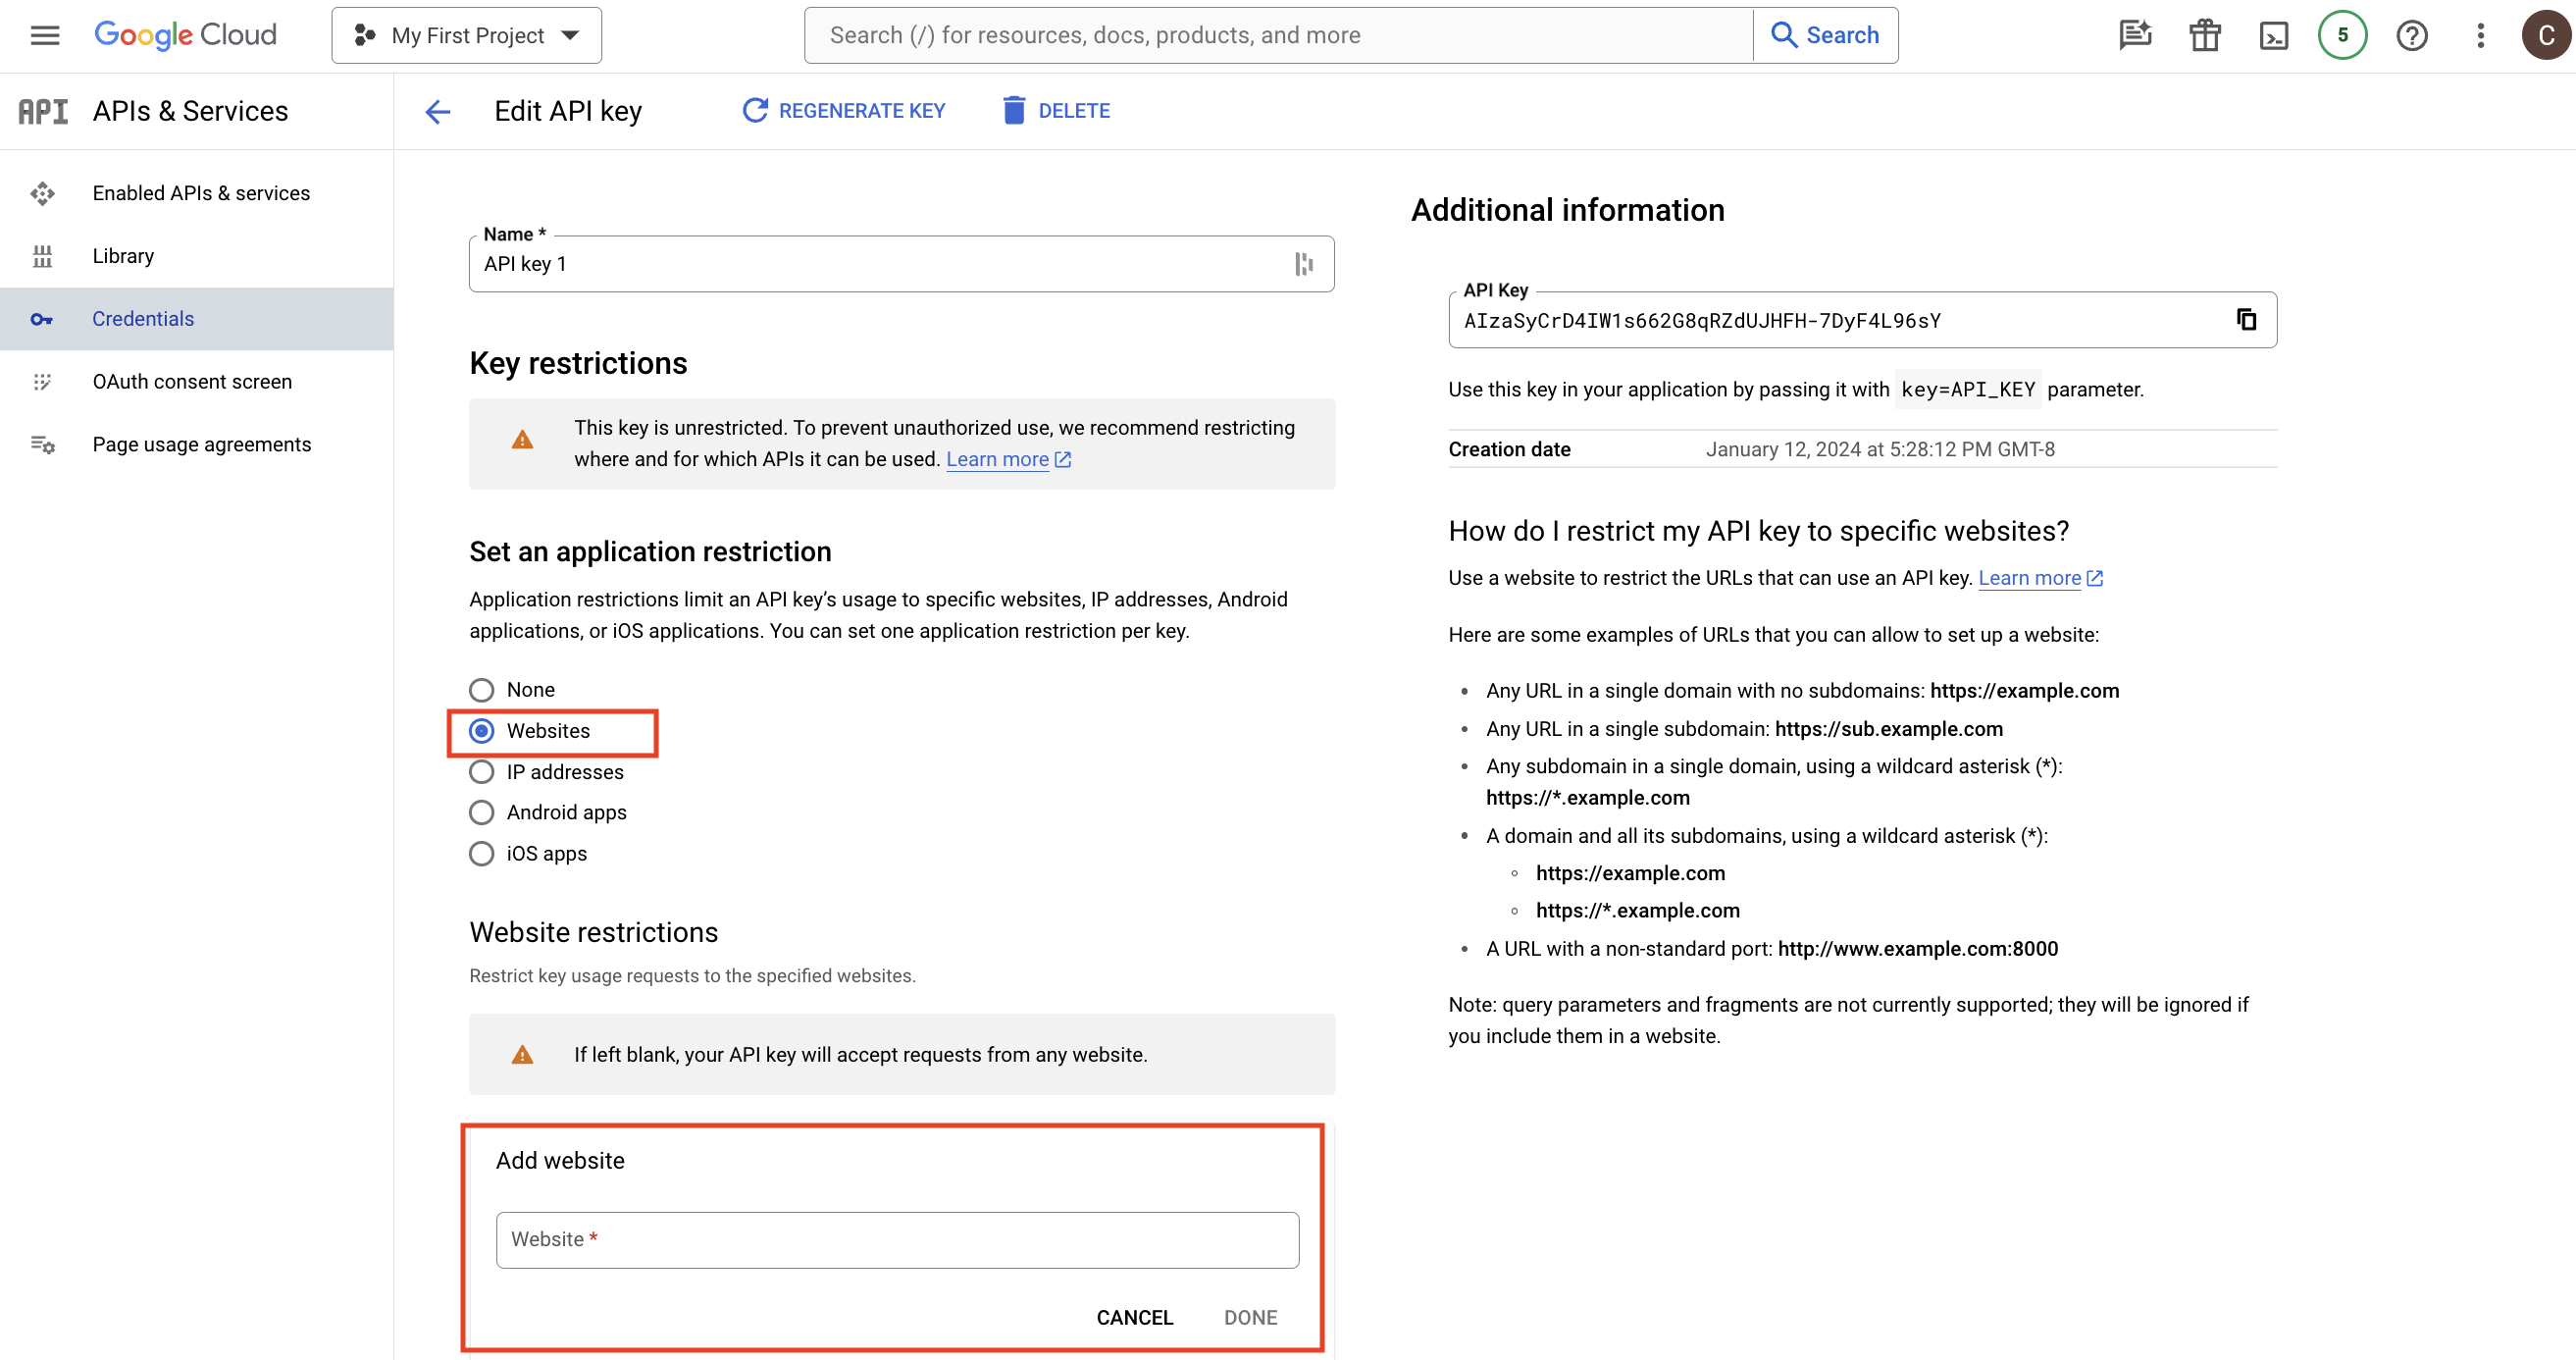
- First, set up an application restriction for ‘Websites’ (previously called HTTP referrers).
- Under ‘Website Restrictions,’ select ADD and enter the name of your domain *yourdomain.com/
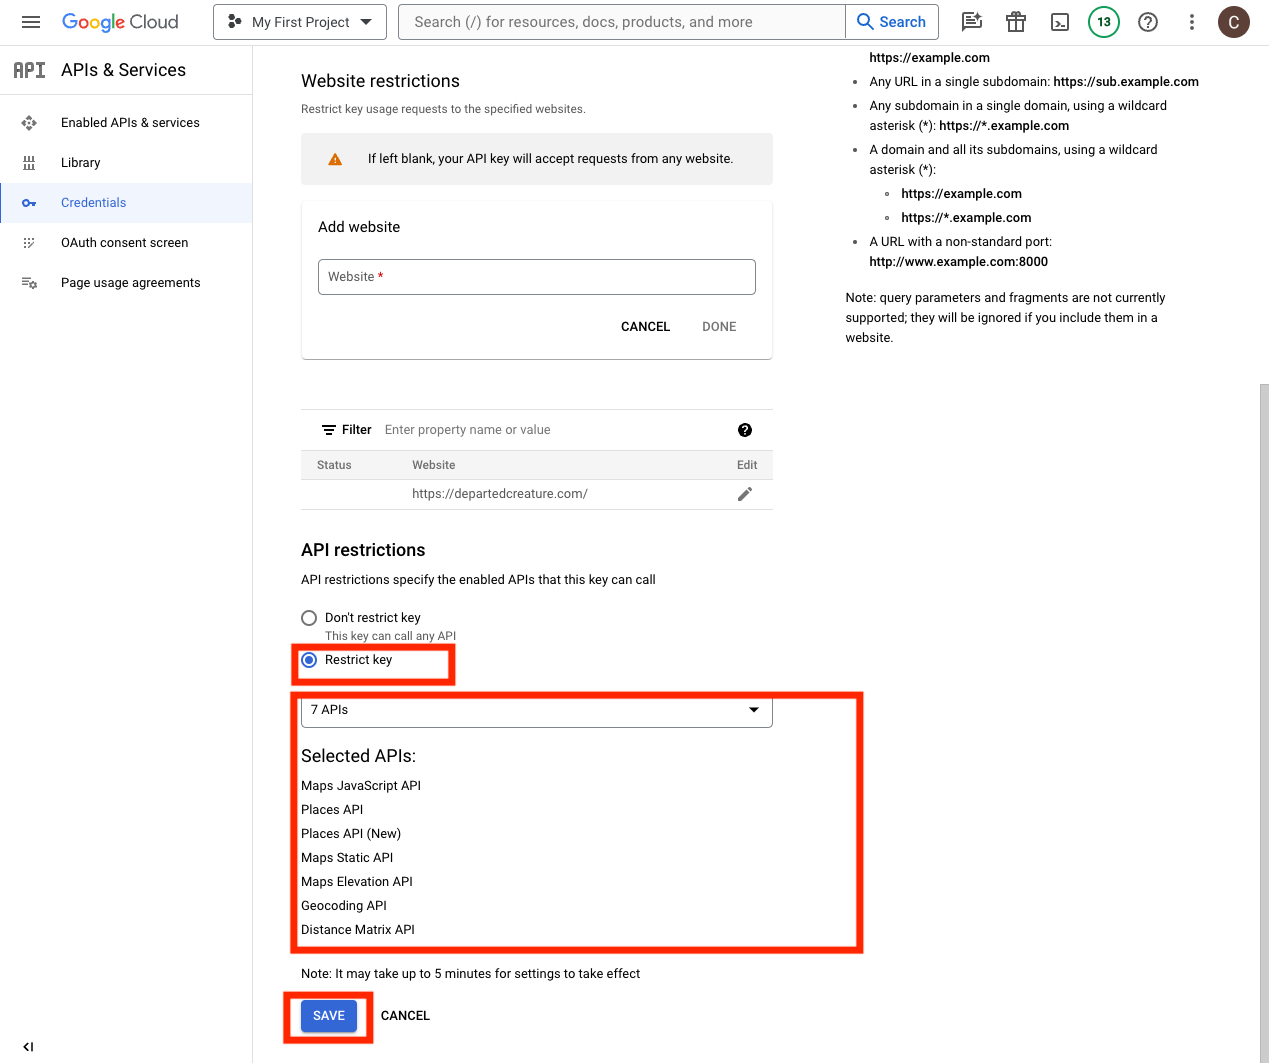
- Next, set up API restrictions for API Key 1. It’s important to note that you should only do this for ONE of your API Keys for the Google Maps Platform.
- Select Restrict Key
- Add the following APIs:
-
- Javascript API
- Geocoding API
- Directions API
- Distance Matrix API
- Elevation API
- Places API & Places API New
- Static Maps API
- Save
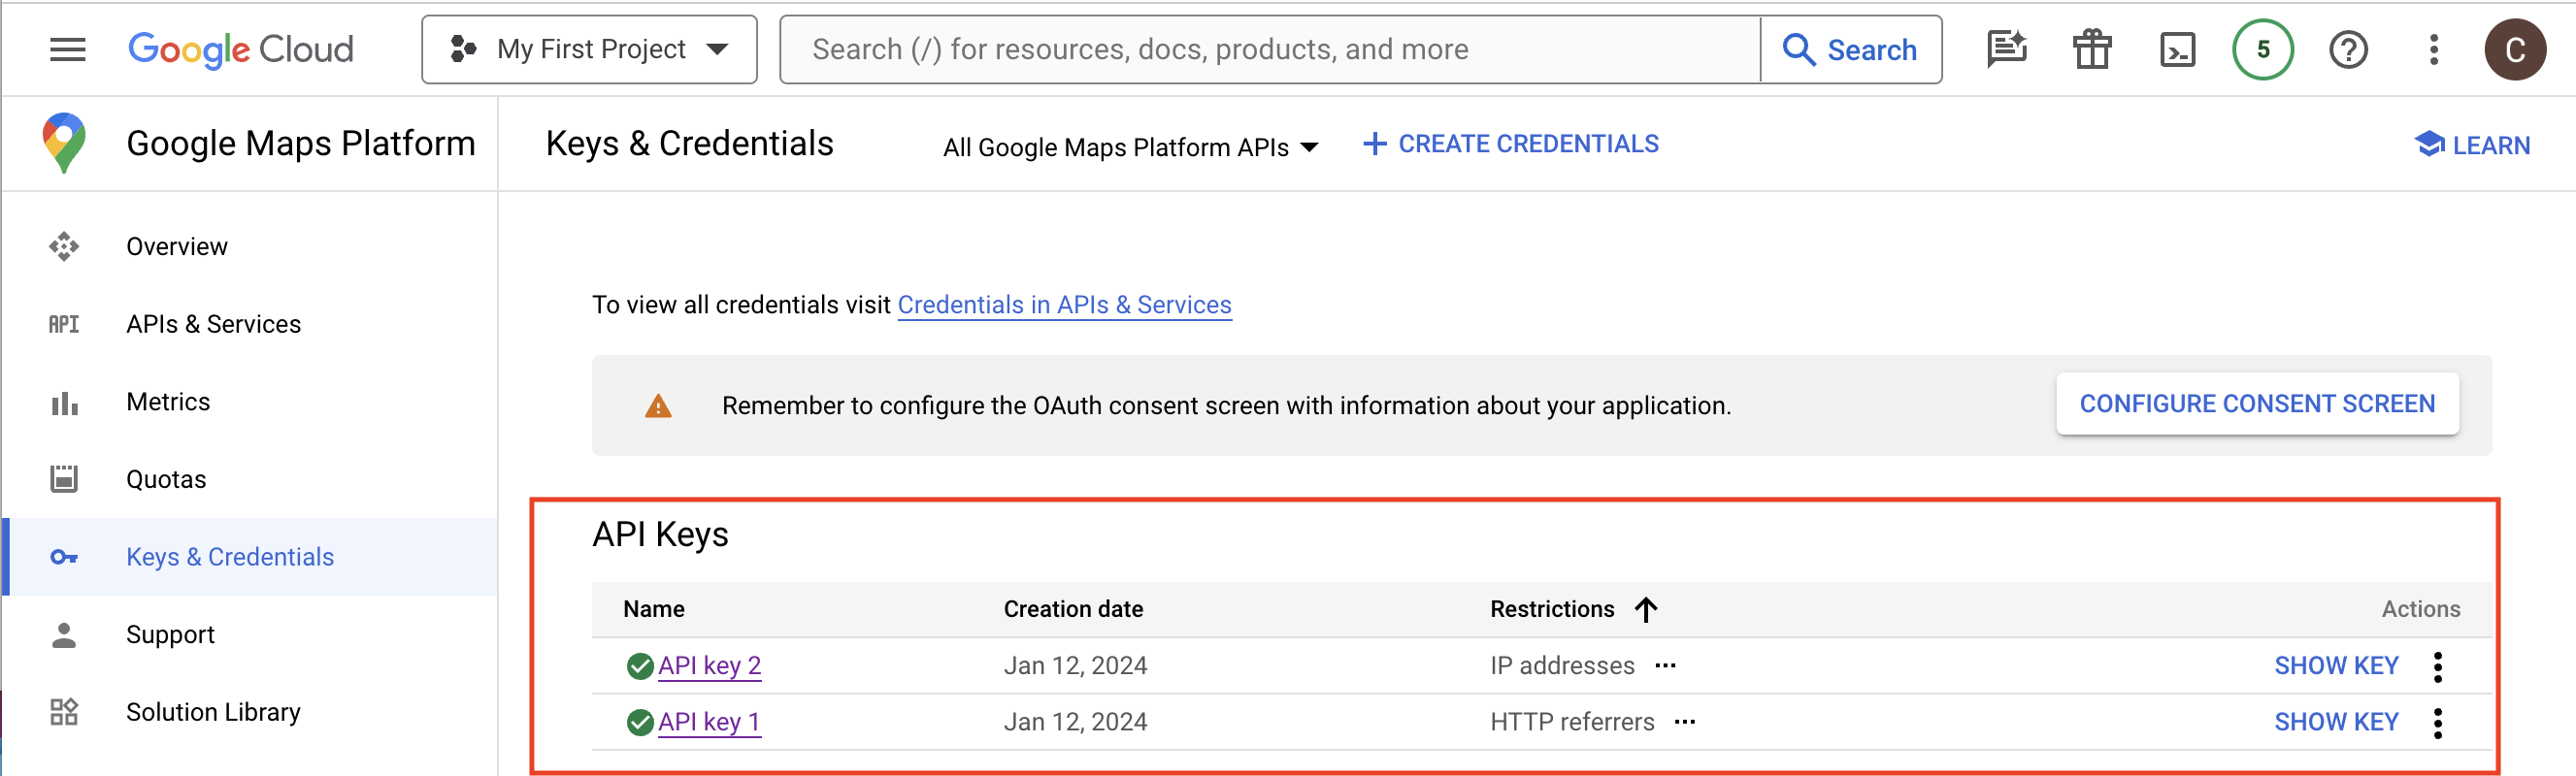
After saving your API edits, you will be taken back to the Google Maps Platform home screen. Your API Key should show a green checkmark next to it and indicate that your restrictions are on for HTTP referrers with 7 APIs.
Step 5: Create Second API Key
Now that you have completed your first API Key setup, it’s time to set up the second API Key. This API Key is known as the ‘server-key’ and is used by Google Maps Geocoding to create coordinates from an address.
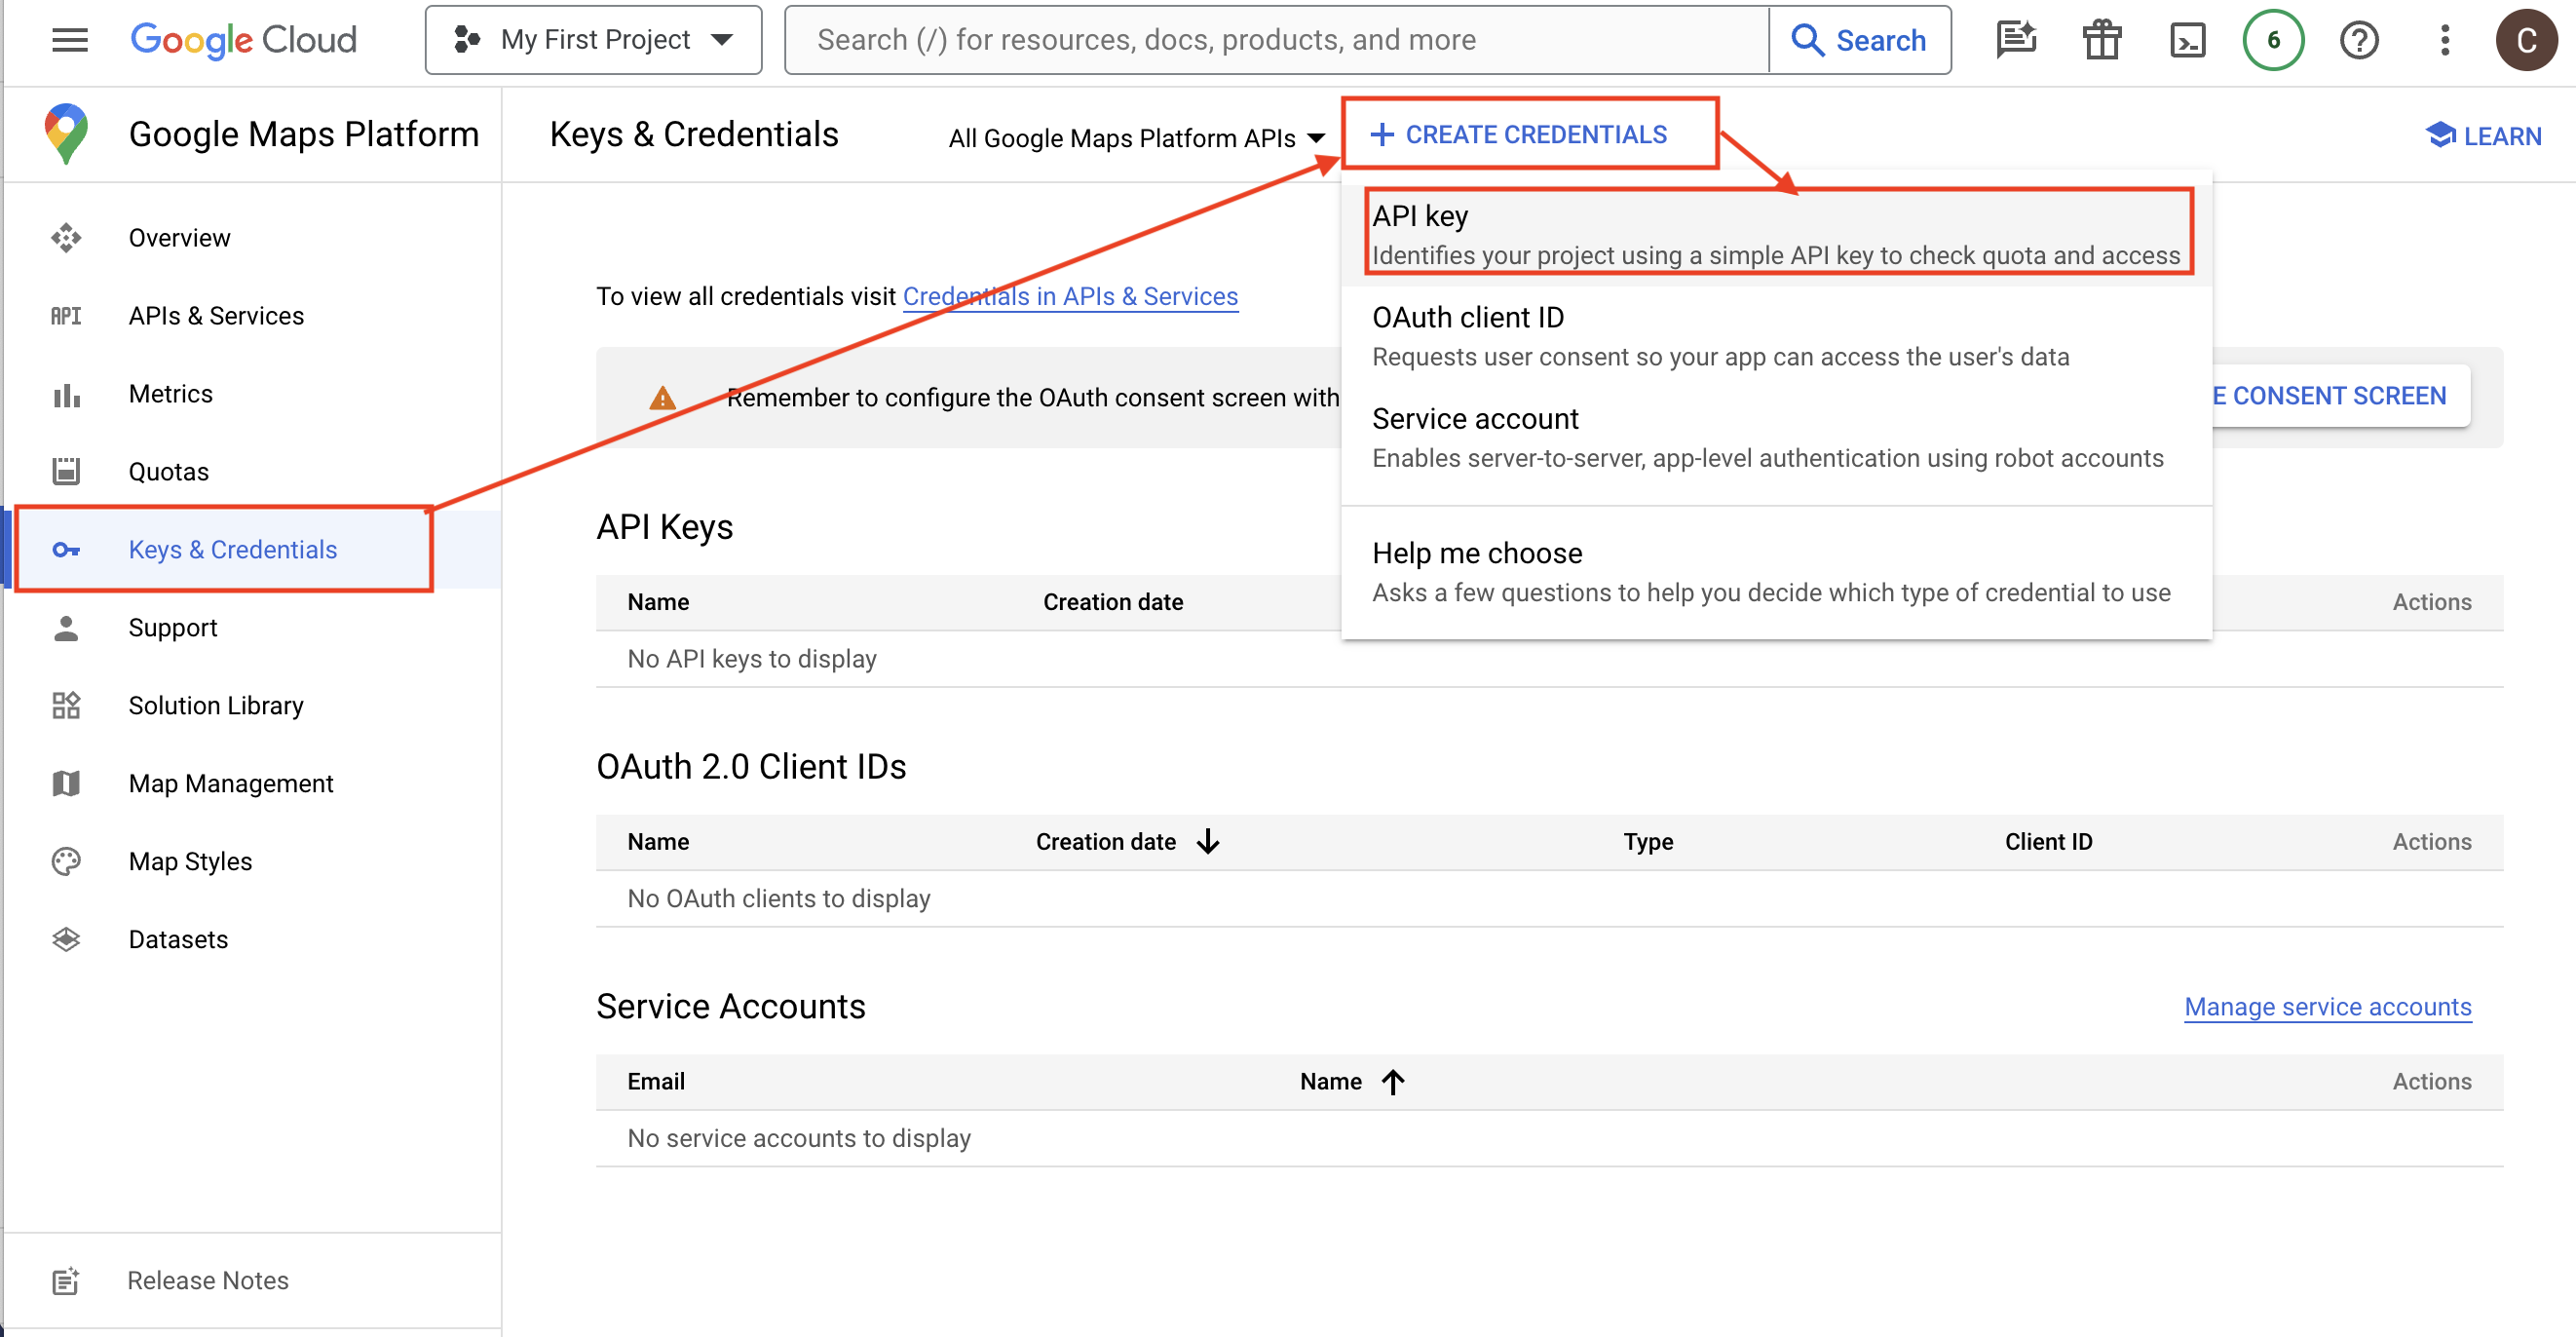
Start by selecting ‘+Create Credentials’ and clicking ‘API Key.’
- This will automatically generate a new API Key.

Now, you will need to set up restrictions for your second API Key by selecting ‘Edit API Key.’
Step 6: Setting Up IP Address Restrictions
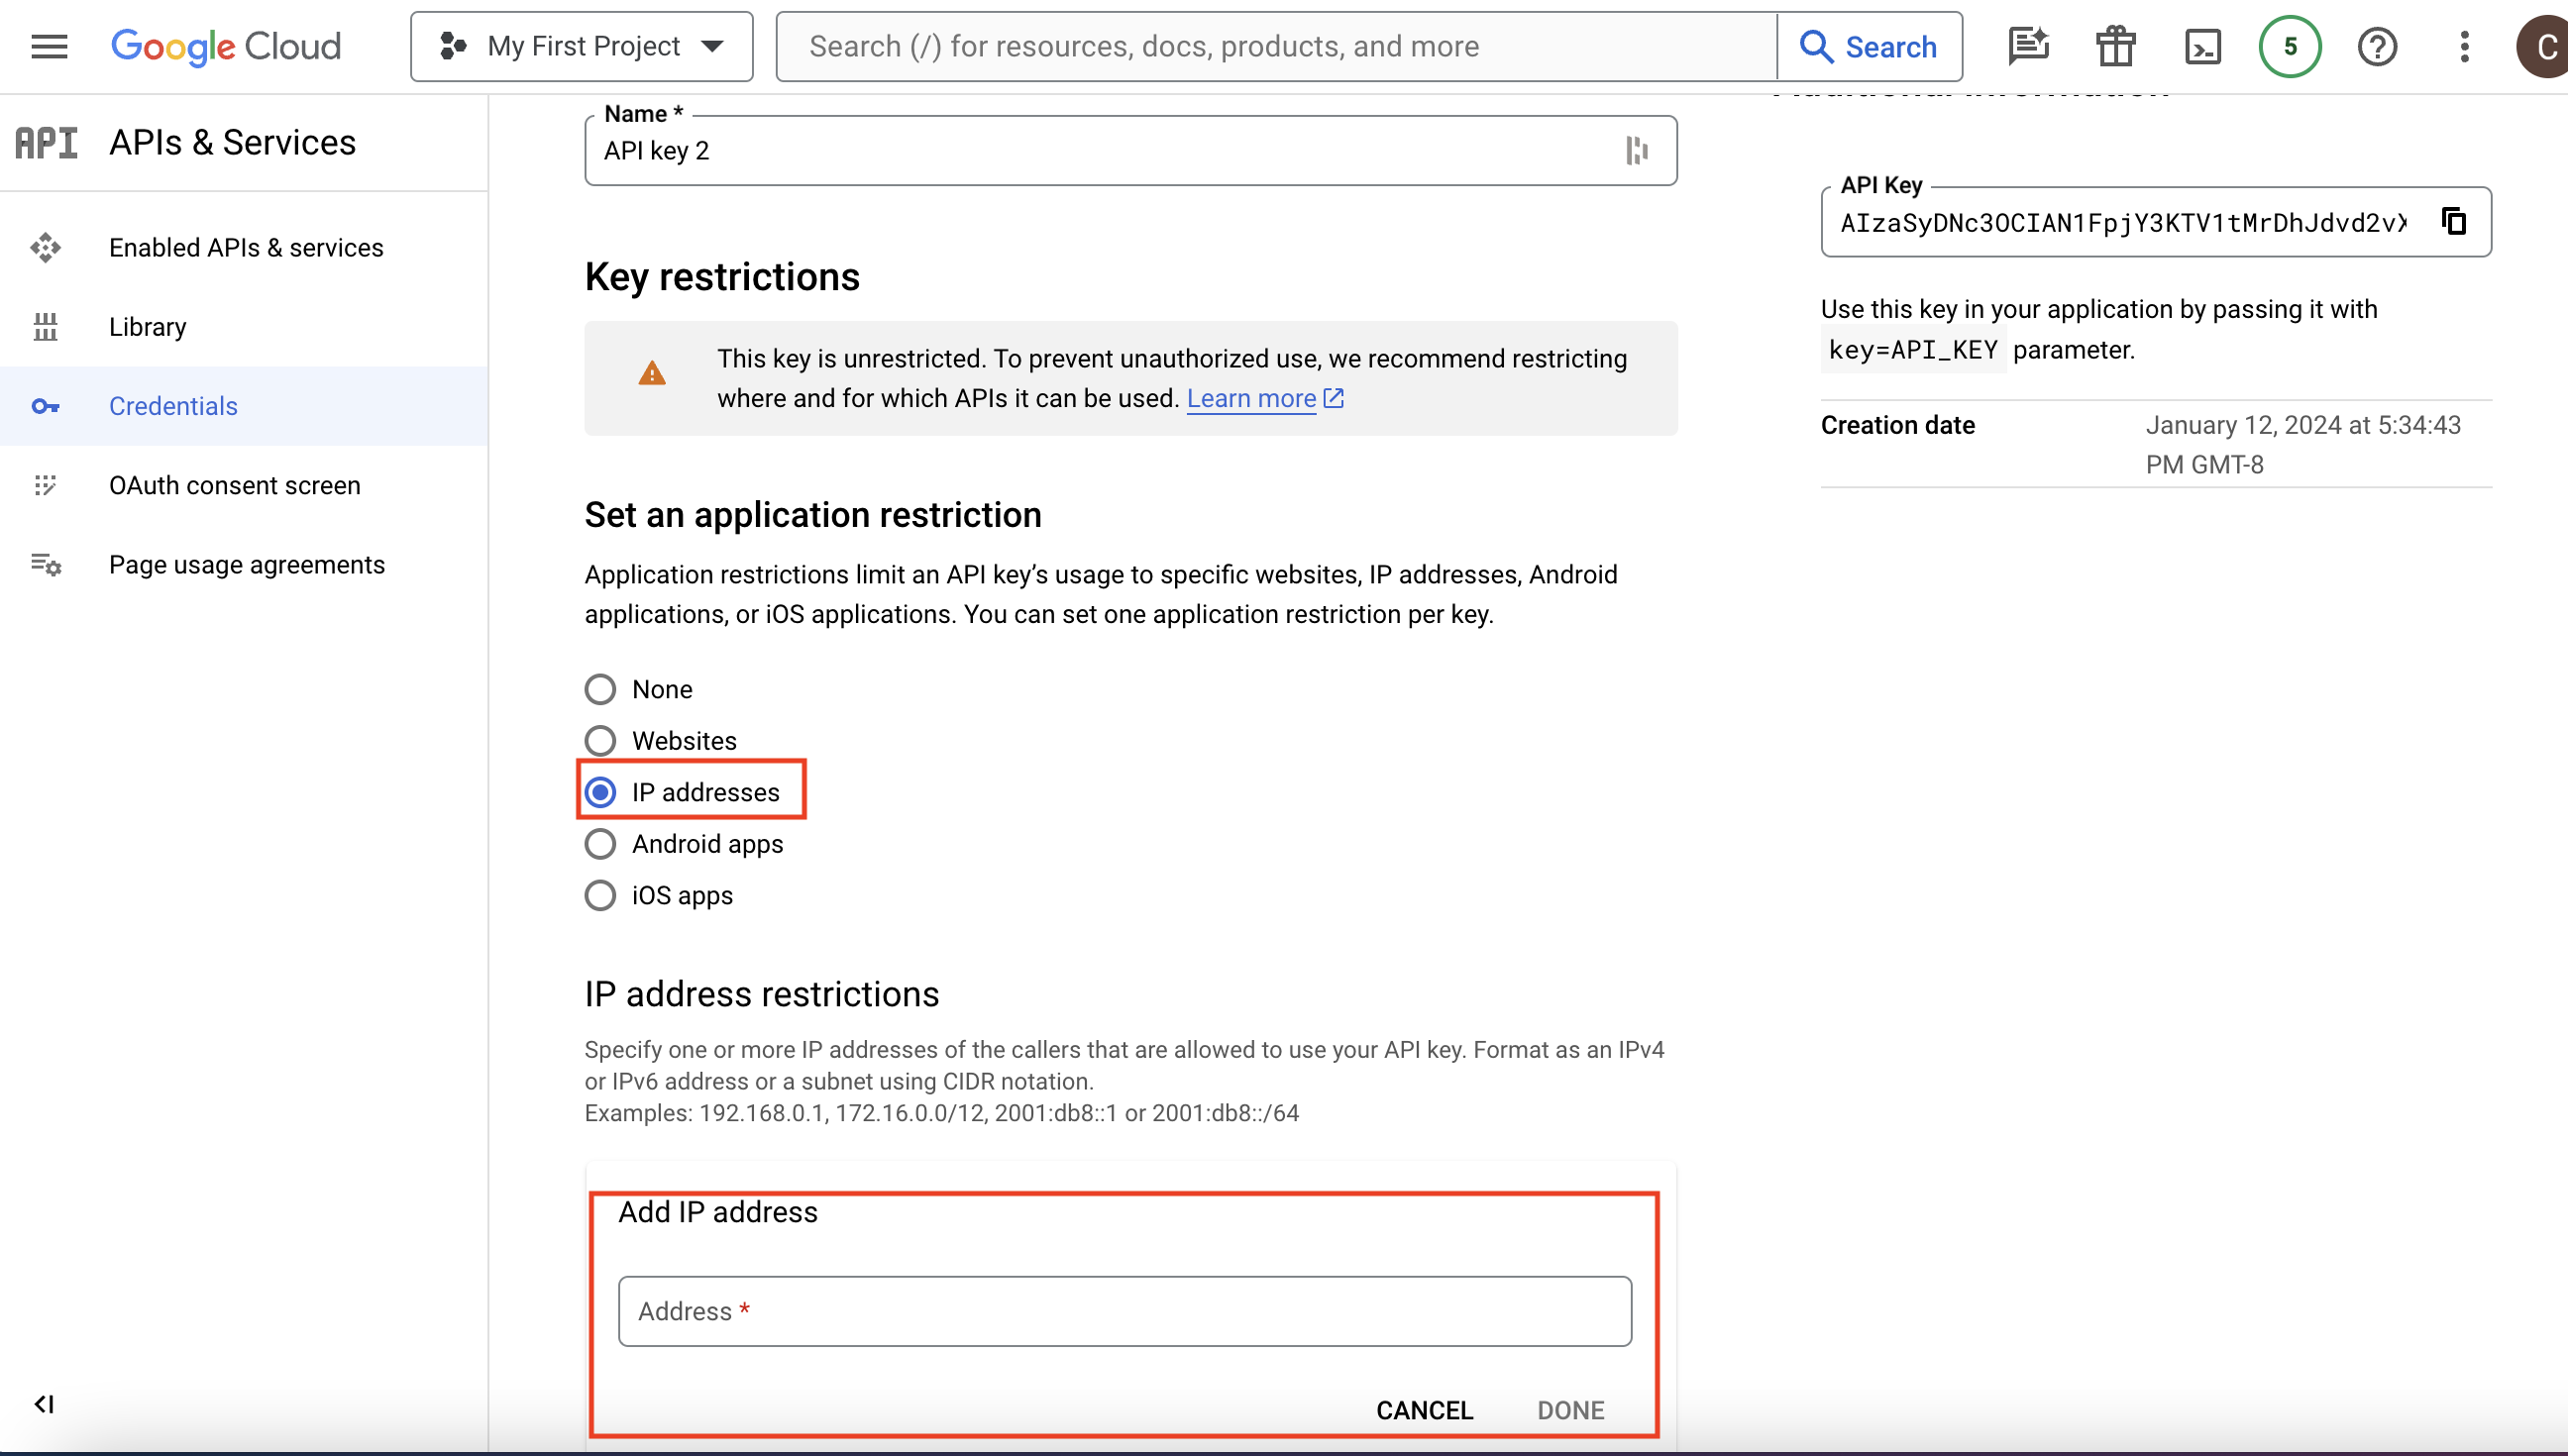
For API Key 2, you will want to set up application restrictions for IP addresses.
- Select IP addresses
- Enter your IP address
- Save
**Remember, you are NOT setting up Key Restrictions for this API Key, only application restrictions.
Step 7: Verify Both API Keys 1 & 2
Once you have saved the settings for API Key 2, you will be redirected to the home page of Google Maps Platform. Your screen should look like this:
Creating Google Maps Platform API Keys Manually
The process for manually creating a Google Maps Platform API Key is similar to the automatic version above. After navigating to the Google Maps Platform, click the ‘Get Started Button’ and log into the Google account that is associated with your account.
If you do not have an account, you must set up billing and start a free trial. Please see the steps above for the process for new users.
Step 1: Enable Proper APIs
Before setting up restrictions on your API Key, you must manually enable the proper APIs and Services products.
First, click on APIs & Services:
Next, enable the following products:
- Javascript API
- Geocoding API
- Directions API
- Distance Matrix API
- Elevation API
- Places API & Places API New
- Static Maps API
Step 2: Create API Key 1
Once you’ve enabled the proper API service products, you will be ready to create API Key 1. This API Key is known as the ‘browser key’ and is used when Google Maps JavaScript requests data from the front end of your site.
- Select Keys & Credentials
- + Create Credentials
- API Key
This process will automatically generate an API key for you.
Step 3: Set Up Website Restrictions
Now that you have enabled the correct API products head back to the API Keys by selecting Keys & Credentials on the left side, clicking the three dots, and ‘Edit API Key.’ From here, you must set up restrictions for your API Key.
- First, set up an application restriction for ‘Websites’ (previously called HTTP referrers).
- Under ‘Website Restrictions,’ select ADD and enter the name of your domain *yourdomain.com/
- Next, set up API restrictions for API Key 1. It’s important to note that you should only do this for ONE of your API Keys for the Google Maps Platform.
- Select Restrict Key
- Add the following APIs:
-
- Javascript API
- Geocoding API
- Directions API
- Distance Matrix API
- Elevation API
- Places API & Places API New
- Static Maps API
- Save
After saving your API edits, you will be taken back to the Google Maps Platform home screen. Your API Key should show a green checkmark next to it and indicate that your restrictions are on for HTTP referrers with 7 APIs.
Step 4: Create Second API Key
Now that you have completed your first API Key setup, it’s time to set up the second API Key. This API Key is known as the ‘server-key’ and is used by Google Maps Geocoding to create coordinates from an address.
Start by selecting ‘+Create Credentials’ and clicking ‘API Key.’
- This will automatically generate a new API Key.
Now, you will need to set up restrictions for your second API Key by selecting ‘Edit API Key.’
Step 5: Setting Up IP Address Restrictions
For API Key 2, you will want to set up restrictions for IP addresses.
- Select IP addresses
- Enter your IP address
- Save
Step 6: Verify Both API Keys 1 & 2
Once you have saved the settings for API Key 2, you will be redirected to the home page of Google Maps Platform. Your screen should look like this:
This is just one step you can take toward creating a better user experience on your website. Let us help you create a more user-friendly, well-designed, search engine-optimized website. Contact us today.